

There’s a moment every Long Island boater knows — the one where you pull back the cover for the first time in spring, take a look at your boat sitting in the slip or on the trailer, and feel that mix of excitement and mild dread. Excitement because another season is right around the corner. Mild dread because you know there’s a list of things to go through before you can actually turn the key and go.
If this is your first or second season as a boat owner, that list can feel overwhelming. The good news is that spring commissioning is more straightforward than it looks once you break it down into sections. Work through it methodically, don’t rush any single step, and you’ll be on the water with confidence rather than anxiety.
Our service team at Modern Yachts has been commissioning boats on Long Island’s East End since 1967. Below is the checklist we’d walk any new owner through — honest, practical, and written for real boaters, not engineers.
A Quick Note on Timing
On Long Island, most boaters aim to have their boats commission-ready by Memorial Day weekend at the latest. But with a typical spring like 2025’s, late April through mid-May is the sweet spot — water temperatures are rising, the yards are active, and parts and service appointments are still available before the pre-season rush. If you’re reading this in March or April, you’re in good shape. If it’s already May, move quickly — service availability at East End marinas fills up fast.
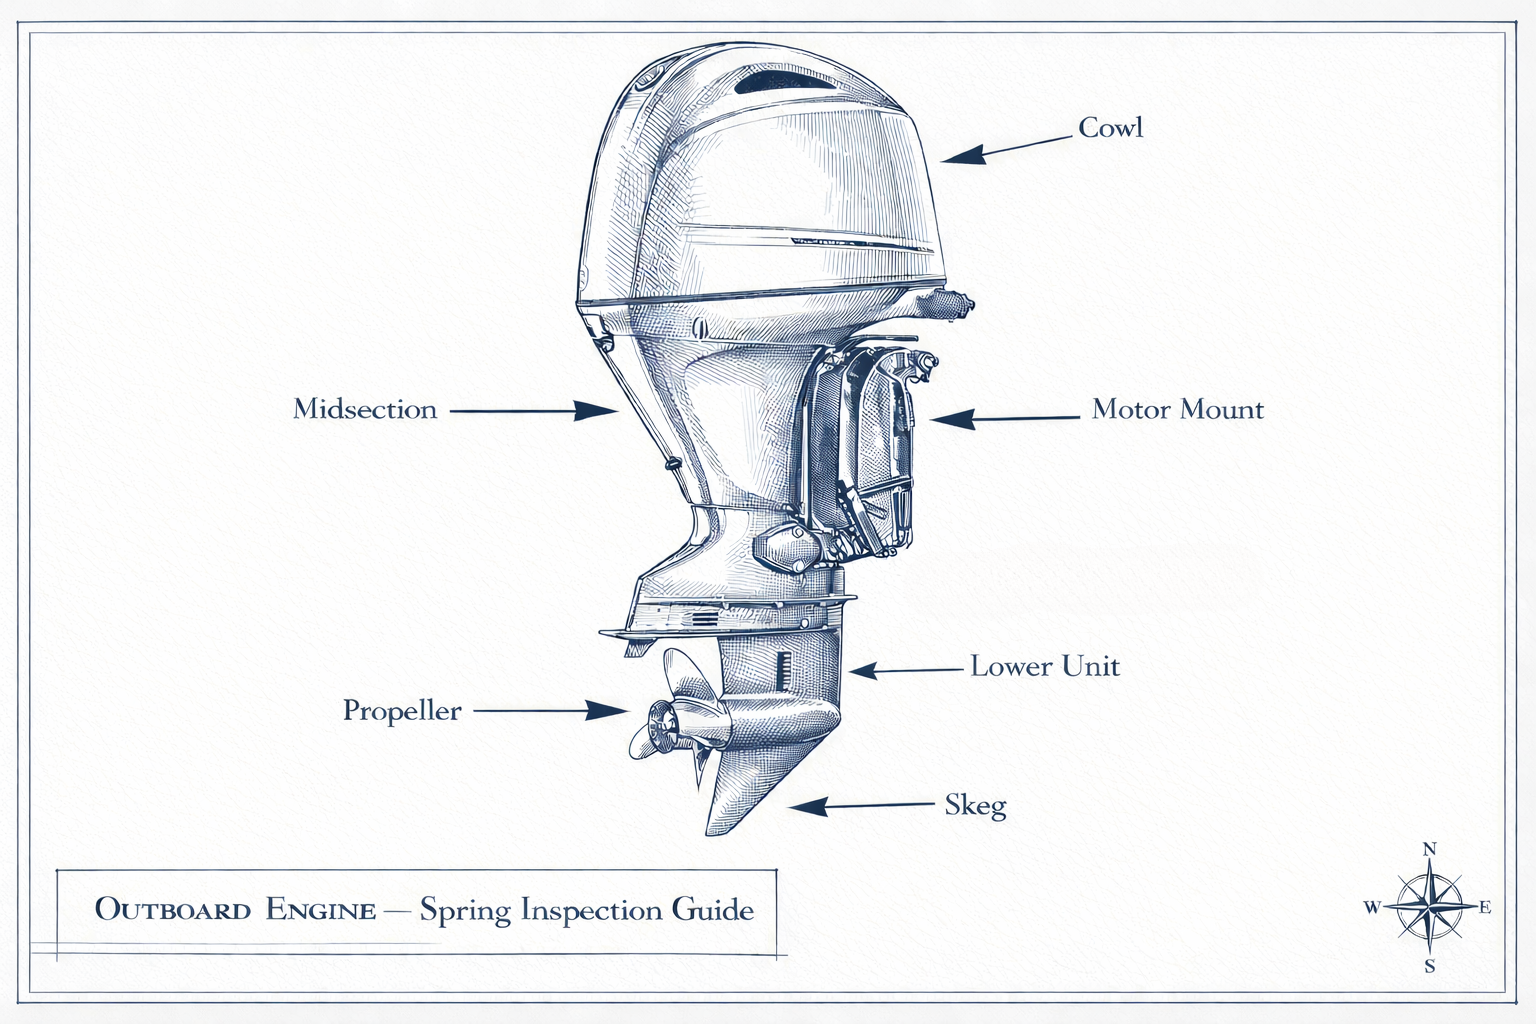
Part 1: Engine & Mechanical Systems
This is the most important section — and the one where cutting corners is most likely to ruin a day on the water. If you’re not mechanically comfortable, this entire section is worth handing to a certified technician. At Modern Yachts, our certified Yamaha and Mercury service teams handle spring commissioning at all three locations.
Engine inspection checklist:
- Change the engine oil and filter. If you didn’t do this at the end of last season (you should have), do it now before the engine runs. Running old, contaminated oil is one of the fastest ways to cause premature engine wear.
- Inspect the lower unit oil. Remove the drain plug and check the gear oil. If it looks milky or grey, water has entered the lower unit — a serious issue that needs attention before launch. Clear, amber-colored oil is what you want to see.
- Check and replace the fuel filter. Particularly important if your boat sat with fuel in the tank all winter. Old fuel can varnish up and clog filters quickly.
- Inspect the fuel system for leaks. Check all fuel lines, connections, and fittings for cracks, softness, or seepage. Do this in a well-ventilated area. Never start the engine if you smell fuel.
- Check the water pump impeller. This small rubber component circulates cooling water through your engine. They degrade over time and should be replaced every 1–2 seasons regardless of appearance. A failed impeller means an overheated engine — potentially catastrophic damage in minutes.
- Inspect belts and hoses. Look for cracking, fraying, or softness. Replace anything that looks questionable — these are inexpensive parts with expensive failure consequences.
- Check the battery. Put it on a charger overnight and test its voltage output. If it won’t hold a charge above 12.6 volts, replace it. Batteries that sit uncharged all winter often don’t recover. Keep a spare aboard once you’re out on the water.
- Flush and test the cooling system. Before launching, flush the engine with fresh water using a flushing attachment on a garden hose. Run it until the water runs clear.
- Test the bilge pump. Pour a bucket of water into the bilge and confirm the automatic float switch activates the pump. This is your boat’s primary defense against sinking at the dock — test it every spring without fail.
- Check the propeller. Remove it and inspect for dings, bends, or nicks. Even small propeller damage affects performance and fuel economy significantly. Check the prop shaft seal for fishing line wrapped around it — a common cause of seal failure.
Part 2: Hull & Bottom Paint
Hull inspection and preparation checklist:
- Inspect the hull for cracks, osmotic blistering, or stress fractures. Run your hand along the hull below the waterline. Small gelcoat cracks are common and usually cosmetic — larger cracks that go through the laminate need professional repair before launch.
- Check the transom for softness. Press firmly on the transom, especially around the engine mounting area. Softness or flexing indicates water intrusion into the transom core — a significant structural issue that should be assessed by a technician.
- Assess last year’s bottom paint. Antifouling bottom paint has a finite effective life. If last season’s paint is peeling, chalking heavily, or if growth was a problem by late summer, it’s time for a fresh coat. For Long Island waters, a hard antifouling paint works well for boats that stay in slips; ablative paints suit boats that are trailered or have variable usage.
- Apply fresh bottom paint if needed. This is a DIY-friendly job with the right preparation — clean and lightly sand the existing surface, apply two coats of antifouling paint, and allow proper drying time before launching. Wear gloves, eye protection, and a respirator. Many boaters bring their boat to our yard for this — our team handles it regularly.
- Inspect and repack the trailer wheel bearings (if trailered). Wheel bearing failure is one of the most common causes of trailer accidents. If you haven’t repacked them in the last two seasons, do it now. This is a straightforward job with a bearing kit from any marine supply store.
- Inspect through-hull fittings and seacocks. Every hole in your hull has a seacock — a valve that can be closed if a fitting fails. Open and close each one to confirm it moves freely. Stuck seacocks are dangerous. Apply waterproof grease and exercise them several times until they operate smoothly.
- Check the zincs (sacrificial anodes). Zinc anodes protect your hull, outdrive, and propeller from galvanic corrosion. If they’re more than 50% depleted, replace them before launch. This is an inexpensive step that protects thousands of dollars of underwater hardware.
Part 3: Electronics & Navigation
Electronics checklist:
- Test the VHF radio. Turn it on, confirm it powers up, and do a radio check on Channel 16. A working VHF is your primary distress communication tool — it’s not optional. If yours is more than 10 years old, consider replacing it with a current DSC-capable unit that can transmit your MMSI number and GPS position automatically in an emergency.
- Test the chartplotter/GPS. Power it on and confirm it acquires a satellite fix. Check that your charts are current — outdated charts can show incorrect depths, especially in Long Island’s East End harbors where shoaling can be significant.
- Test navigation lights. Run through all navigation lights — bow, stern, steaming, and anchor light. Carry spare bulbs for any that are incandescent. LED replacement bulbs are inexpensive and dramatically more reliable.
- Test the depth sounder. Confirm it’s reading correctly at the dock if possible. A depth sounder failure offshore is at minimum inconvenient and at worst dangerous.
- Inspect wiring and connections. Look for corroded terminals, chafed wire insulation, or loose connections at battery terminals and fuse blocks. Marine corrosion works fast — address anything that looks compromised.
- Check the compass. Confirm it’s level and reading correctly. Your compass is your backup navigation tool if electronics fail — it should always work.
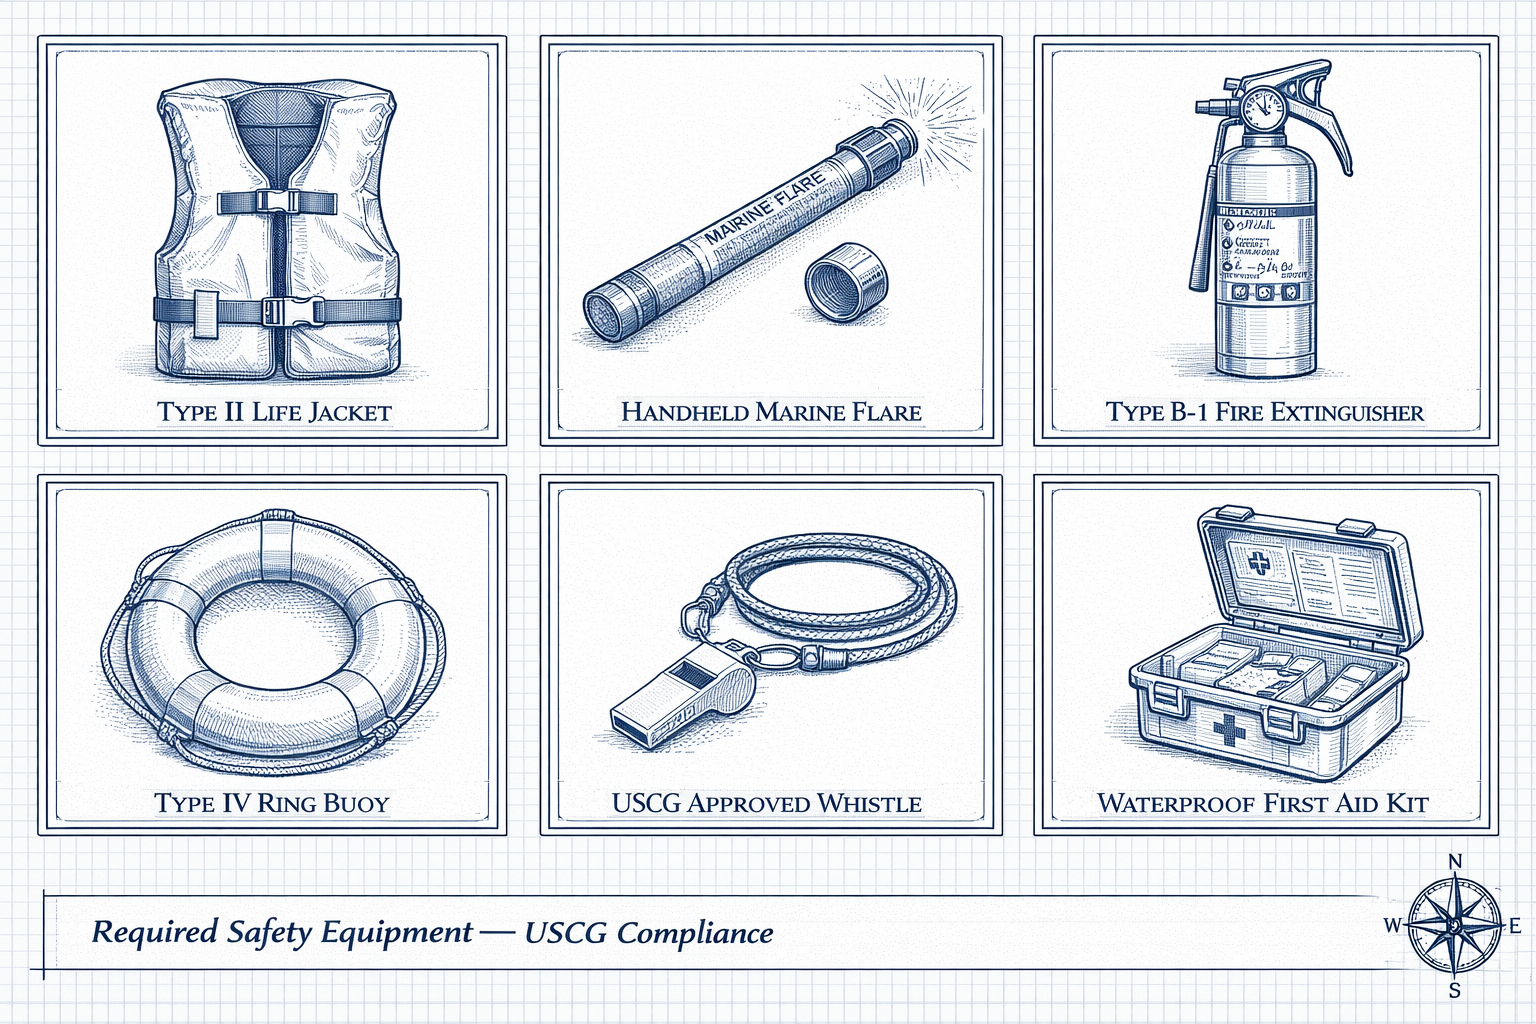
Part 4: Safety Gear & Compliance
This section isn’t optional — the U.S. Coast Guard and New York State require specific safety equipment on every vessel. Inspectors do conduct random boarding checks, particularly on Long Island’s busy East End waterways in peak season.
Safety gear checklist:
- Life jackets (PFDs). Federal law requires one Coast Guard-approved wearable life jacket for every person aboard. Check that yours aren’t faded, waterlogged, or have damaged hardware. Children under 13 in New York State must wear a life jacket while underway on open water. If your jackets are more than 10 years old, replace them.
- Throwable device. Vessels 16 feet and over require one Coast Guard-approved Type IV throwable device (a ring buoy or cushion). Confirm yours is accessible — not buried under gear in a locker.
- Fire extinguisher. Confirm your extinguisher is fully charged (gauge in the green), the pin and seal are intact, and it hasn’t expired. Replace it if there’s any doubt. Mount it in an accessible location, not buried in a storage compartment.
- Flares and visual distress signals. Required on vessels over 16 feet on coastal waters (which includes all of Long Island’s Sound and ocean-side waters). Check expiration dates — flares typically expire after 42 months. Replace any that are out of date.
- Sound-producing device. A whistle or horn is required. Confirm yours works.
- First aid kit. Not legally required but non-negotiable for responsible boating. Replace any expired medications or depleted supplies.
- Anchor and rode. Confirm your anchor is properly sized for your boat and that the rode (chain and line) is in good condition and long enough. A general rule: your rode should be at least 5–7 times the maximum depth you expect to anchor in.
- Spare parts kit. For new owners especially — carry at minimum: spare propeller, extra engine oil, fuses, a basic tool kit, duct tape, and a spare bilge pump. These items have saved many a day on the water.
Part 5: Docking Lines, Fenders & Deck Hardware
Lines, fenders, and hardware checklist:
- Inspect all dock lines. Look for chafing, fraying, or stiffness. Lines that have been in UV exposure and salt water for multiple seasons degrade faster than they appear to. Replace any that show wear — dock lines are not the place to economize.
- Check fenders. Deflated or cracked fenders don’t protect your hull. Inflate soft fenders to proper pressure and inspect rigid fenders for cracks. Make sure you have enough for both sides of the boat.
- Inspect cleats and hardware. Wiggle each cleat — loose cleats should be rebedded with sealant before the season. Check stanchions, rails, and any deck hardware for loose fasteners.
- Inspect the windshield and canvas. Check windshield seals for cracking and canvas for mold, tears, or failed zippers. Clean canvas thoroughly with a marine fabric cleaner before storage marks set permanently. Apply UV protectant.
- Check the anchor windlass (if equipped). Run it through a full cycle. Inspect the rode for wear at the windlass drum.
- Lubricate all moving parts. Hinges, latches, steering components, and throttle cables all benefit from a light application of marine grease or corrosion inhibitor at the start of the season.
Part 6: Interior & Upholstery
Interior checklist:
- Deep clean the bilge. Remove any standing water and clean with a bilge cleaner to eliminate odors. Odors from the bilge often indicate a fuel or oil leak — investigate before dismissing.
- Inspect upholstery. Look for mold, mildew, cracking, or seam separation. Clean with a marine vinyl cleaner and apply a UV protectant. Mold caught early is a cleaning project — mold left through another season becomes a replacement project.
- Check all hatches and compartments for water intrusion. Open every locker and hatch and inspect for moisture, mold, or evidence of water entry. Address the source of any water intrusion before launching.
- Inspect the head (if equipped). Flush with fresh water and inspect hoses and seacocks for leaks or odors. Add marine holding tank treatment.
- Restock consumables. Sunscreen, paper towels, trash bags, a fresh first aid kit, bottled water, extra sunglasses — the basics that somehow disappear every winter.
- Test the freshwater system (if equipped). Run the pump, check all faucets, and inspect hose connections for leaks.
Ready for the Season — Or Want a Hand?
Working through this list yourself is absolutely doable for most items, and going through it once is one of the best ways to learn your boat inside and out. But if anything on this list feels beyond your current comfort level — or if you simply don’t have the time — our service teams in Hampton Bays, Westhampton Beach, and Mattituck handle spring commissioning every year for dozens of East End boats.
A professional commissioning inspection catches things that a first or second-season owner might miss, and gives you the peace of mind of knowing your boat has been gone over by someone who’s seen a lot of boats over a lot of seasons.
Call us at (631) 728-2266 or stop in at any of our three locations to schedule your spring commissioning appointment. Slots fill up quickly in April and May — the earlier you call, the better.
Modern Yachts has been serving Long Island and Hamptons boaters from Hampton Bays, Westhampton Beach, and Mattituck since 1967.
Browse All Boats
Explore our full selection of new and pre-owned inventory across every brand.